
Automated Blinds
I’ve really be into home automation lately. “Hey Alexa, turn on my living room lights!” It’s been interesting diving into the world of home automation. But the one thing I could not fine (at least reasonably priced), was something that would open and close my blinds. Since I’m currently on parental leave from work and needed something to exercise my mind, I decided to tackle it myself.
Two Step Process
The whole approach was going to be two fold, find out if it is possible…then automate it. The first step was to see if I could get it done with a push of a button. What parts would I need? Do I have things on hand? Etc…. From there, I did some digging and came up with this result.
Push Button Capability
DIY z-wave blinds project
DIY z-wave blinds project with momentary button for testing All answers can be found in the first 3 pages of this thread. Read it first. http://forum.micasaverde.com/index.php/topic,17118.0.html Thanks to Realifeonhold, pm him to get on the list for a kit. You need micasaverde vera etc for it to work on zwave.
After watching the above video, I essentially knew what I needed. An Arduino, a High Torque servo motor, something to grab the tilt rod, servo mount, and momentary switch. So off to Amazon and Lowes to find the parts I needed. (Keep in mind, there’s no way my wife was going to be “Okay” with wires and circuit cards hanging around…so I had to make it discreet.)
Parts List
- Adafruit Trinket Pro 5V - $10.93
- TowerPro MG946R Servo - $6.00 to $12.00 (AliExpress ~$5.00)
- Door Bell Switch - $6.00 to $19.00
- 1.25in Dowel Rod - $4.50
- 90 Degree Header Pins - $0.02
- Wire (paired) - $0.35
- 10k Ohm Resistors (3x) - $0.69
- Heat Shrink - $0.04
- Header Connector - $0.08
Total Cost: $28.61
Startup Cost: $51.72 + Wire Cost
So the cost is excellent. Other systems like the Somfy systems require $150-$300 investment initially to get the powered tilt. The difference in the Total and Startup costs is that the Total is the actual cost, where some of the products are purchased in a kit/multiples so the investment in the parts is a little higher. Even with that, $52–before wire–is great. If you don’t mind the shipping delays and got almost everything from AliExpress, you can get everything (in bigger quantities) for around $38.56…that’s awesome.
Prototype
Now I needed to breadboard the process. Getting a push button input is pretty easy. Following this example you are pretty much done. This is how I setup the breadboard for the Trinket:
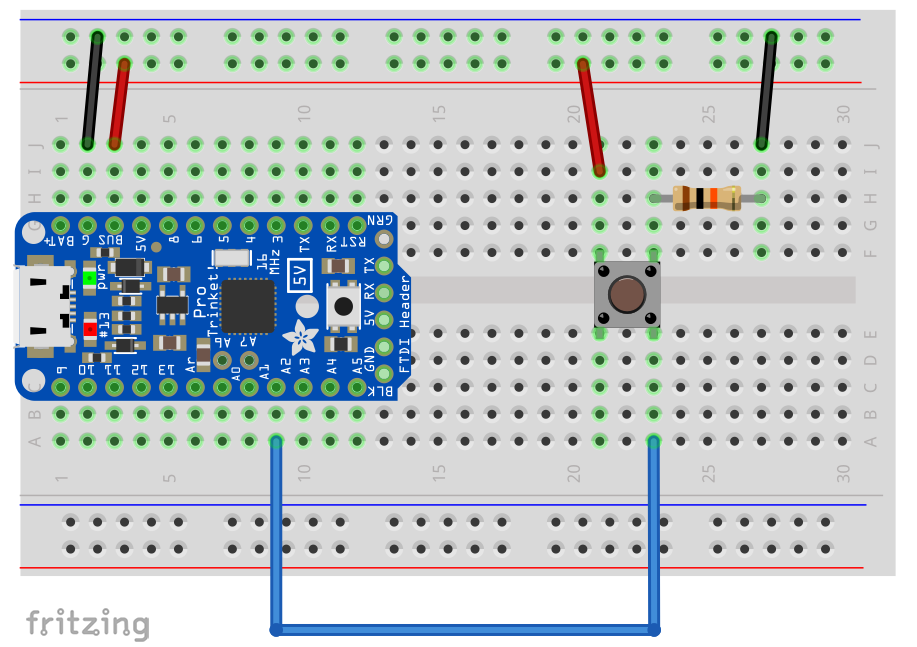
I started with that exact code for the Trinket (swapping the button code to 16: const int buttonPin = 16;) and it worked the first time! YEAH!
Next, I hooked up the Servo. The Trinket has FTDI headers and the “GND/5V/RX” pins at the end are perfectly oriented for the connector that comes with the servo. I plugged it in with the Yellow wire going into RX, like below:
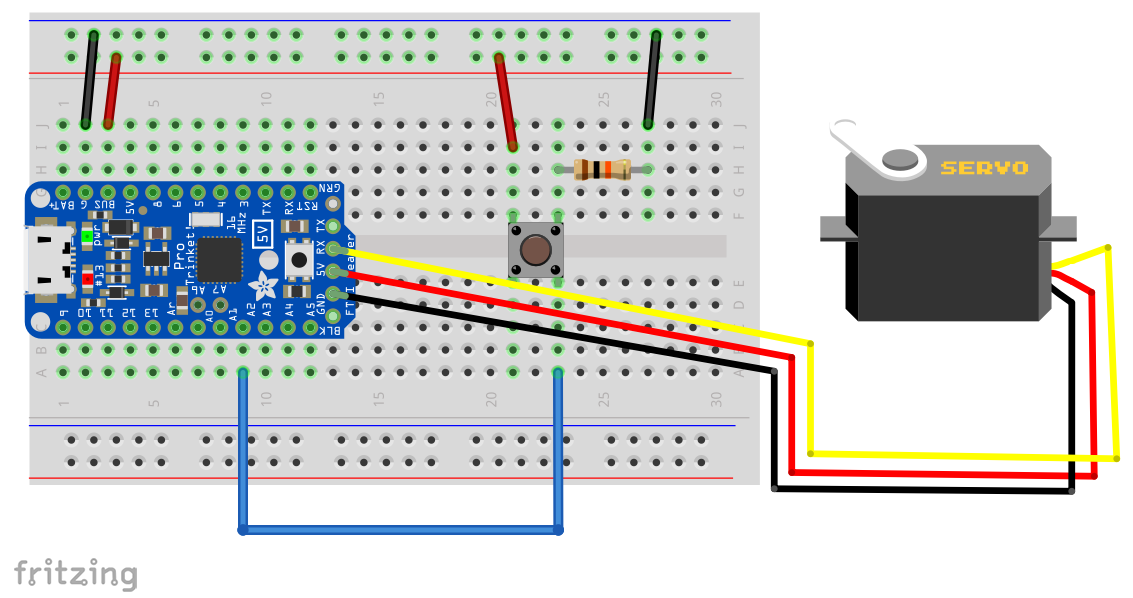
So this is a sufficient setup for a push button activated servo. The code needed to run this setup isn’t difficult, but had to work out a number of kinks. There’s a couple things to note in the following code…
- You’d think the changing the blinds from vertical to horizontal would be a simple 0 to 90 degree change, but it wasn’t. To fully open, I needed a 125 degree angle.
- I had to learn about a thing called Debouncing…so sometimes when you press the button it will register as hit twice instead of once. I also had issues when power fluctuated it would mess with things. I’d be sitting there watching Timeless and the AC would kick in and the blinds would close/open on me. The tutorial code seems a bit messy, I simply required the button to be pressed for more than 250 milliseconds by re-checking it after a delay. But it’s super important to Debounce the input…really important.
- I use the Servo state (the angle) to let the code know the current state of the blinds. If it’s at 0, then Open the Blinds, if it’s already at 125 (Open) then close the blinds.
- Lastly, to keep the servo from moving back and forth, I put a half-second delay when the servo starts moving. The expectation is the operator will release the button upon the event occuring, and it definitely helps.
| |
We’ve now got a working prototype. Push the button, the servo moves…push it again, it moves back.
Packaging
Now to install it into the blinds. I have to take this mess…

And get it into a set of 2in blinds. Additionally, I need to make sure the servo does not spin, but spin the tilt rod, as well as find some way to grab the tilt rod. So essentially I need at least 2 custom parts.
So it was time to model it up. I used OnShape (they used to allow 10 private files, don’t know why they stopped, this honestly–combined with the online structure–was the differentiating factor for using them over something like FreeCAD or SketchUp, it’s sad they eliminated it) to model the blinds and tilt rod, then put all the parts in. Made sure I could fit in some wires (measurements and assumptions), then built a part to hold everything.
The screws generally come packaged with the Servo, so nothing more there (I used some basic McMaster-Carr models to simulate what I had). I had to cut off one of the mounting ears of the Servo to get it to fit, but was also surprised at how well it fit after I Dremeled them off. It made for the custom part to be build relatively simple.
Next was getting the Tilt Rod to move with the servo. I used 1.25in Dowel rod because it was cheap and I had a 6mm chisel, and the rod was a 6mm square. I was able to use this to make a nice square hole in the dowel rod that accepted the tilt rod nice and tightly. This way I don’t lose motion while it waits to grab to rod, nor do I need to worry about any backlash either. Wood also worked in my favor for fastening, easy to handle and the right combination of softness and strength.
Finally, I filled the rest of the space with a block that holds all the parts. I did not want to drill holes in the blinds or anything, so just filling the space allows it to hold firmly in place during motion and does not need screws. This again is huge for troubleshooting and aesthetics.
If you have your own 3D printer, then feel free to build the parts yourself. If you don’t, then I’d highly suggest 3D Hubs. I had 2 of the base parts made for $15.00 total. That’s cheap… So tack on $7.50 more (or less if you have your own printer) to the overall cost, and you’re still getting out cheap.
Another design choice I really wanted to address was power to the Trinket. I wanted to use USB (the trinket can get power elsewhere up to 16V) because I wanted to be able to change the code without ripping the whole thing out of the blinds all the time. This worked out with a 10ft USB cord I had lying around so it became really easy to troubleshoot (remember to debounce…). All the wire was run towards the window down the wall and fairly hidden away.
To get everything to fit, I had to cut about 2 inches off the tilt rod. It’s not a problem, even if things go horribly bad you’re blinds can still work with the shortened rod. But this off, gives you the needed space to get all the parts in the blinds. Finally, the button is wired and mounted on the wall. I bought a nice brushed nickel door bell switch to–again–keep my wife from seeing a “hobby home” instead of our “living home”. If you do use a door bell switch, keep in mind that most have a light in them, so technically it’s like the button is constantly pushed. But it is easy to remedy by just snipping out the light and you’ll have a true momentary switch.
Everything looks really nice and instead of a twist pole, I have a button….but that’s not automated. That’s simply a convenience you don’t need…
Z-Wave
Now we need to automate it. In the original video, (if you watched it) the guy mentioned a Z-Wave button. That device was a Remotec ZFM-80US, and although good and working it’s bulky (remember my wife does not want ugly fixturing) and if you can find it, it’s expensive ($40-$50). So I decided to avoid that. Additionally, I use the Wink system and if I was to install that switch, the system will think it’s a Light/Power switch. I don’t want a power switch to control my blinds, I want blind controllers!
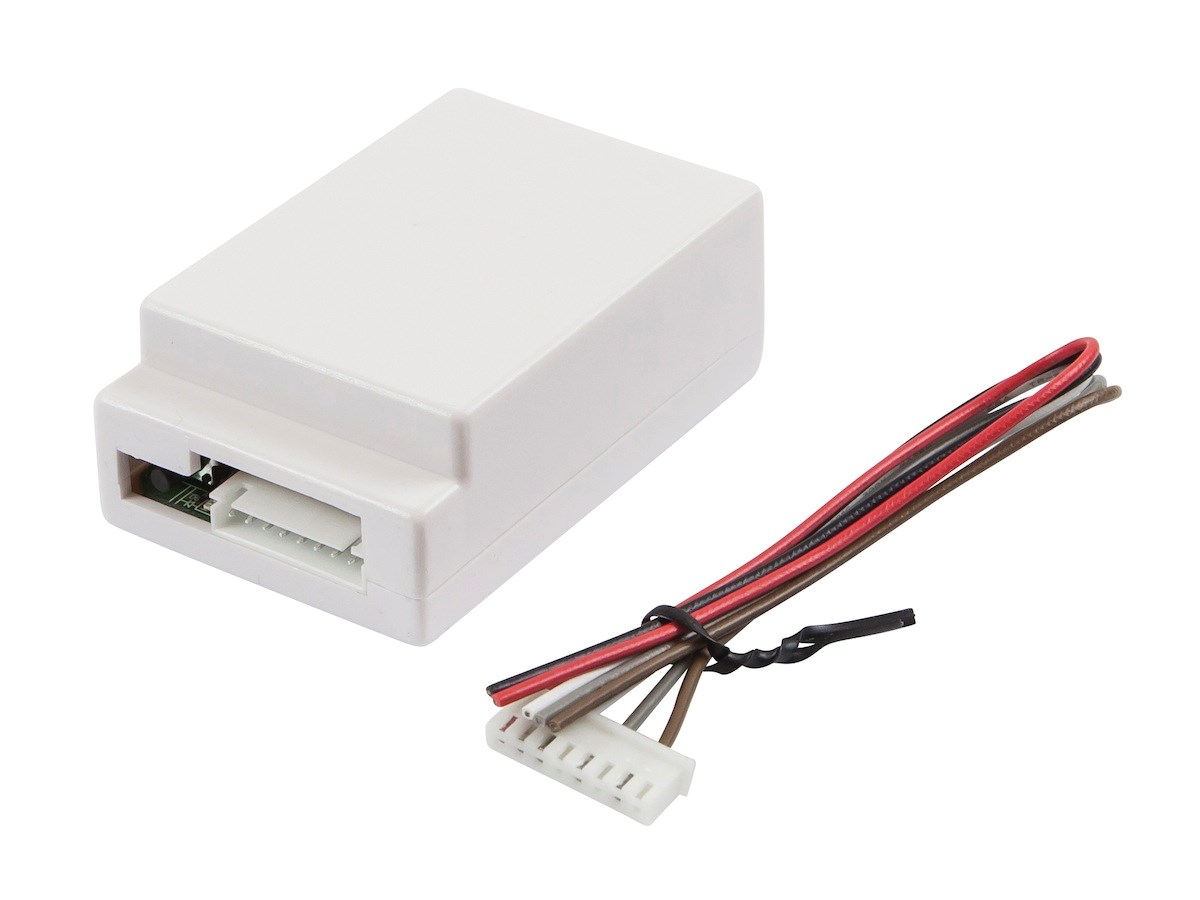
Enter the Monoprice Z-Wave Curtain Module! This little device is designed to control motorized curtain rolls, like Metech’s or a Projector Screen. For $14, it handles all the Z-Wave functions, provides some features we can use in the Trinket, and shows up as blinds in my Wink app…pretty awesome!
Adding it to the Push Button
So we don’t want to abandon the button (it’s automated but need manual control…), so we need to add this to the system. This was a pretty big hurdle. The datasheet says it needs 12V, so I began to reconsider everything I built regarding how I would powered the push button portion. USB is 5V, not 12V… I’d need a 12V-to-5V converter, a 12V Power supply instead of a standard phone charger type supply, and more wire….
After some experimentation with a 12V battery and knowing how I wanted to wire things, I said…“Screw it, let’s see if it will run on 5V from the Arduino Bus.” Sure enough, it runs fine on 5V. So that was a life saver, I don’t need any special 12V power sources and more wires. I can keep things clean. And since I’m using the 5V Bus on the FTDI header, I have a wide open 5V bus pin available (power to the push button can be move to the 5V 150mA MAX pin right next to the Bus line).
Wiring
Since I have no details to how this little thing works, I had to do some experimenting with the device. Additionally some Google-fu helped me understand that the 3 Signal lines are connected to the collector end of a NPN Transistor. Looking at this schematic (I’ll admit, this took me a second to fully grasp), I realized instead of a pull-down (like the push button), I can use the Transistor as a switch for a pull-up style circuit.

The box is emitted to ground already (same 5V ground now that it’s being powered by the same Bus), so when the signal for the OPEN (V-IN) is energized, the Trinket (V-OUT) will see a low voltage instead of the high voltage seen when not energized. Using 2 more 10k Ohm resistors, I loaded them into that diagram (equivalent) and proceeded to have my Wink Hub command to Open the blinds, then Close the Blinds.
Things worked great, but I notice one really odd thing. The Open signal (WHITE from the datasheet) would only read LOW when commanded to Close. The Close (GRAY from the datasheet) would only read LOW when commanded to Open. No big deal, just need to swap my Pin assignments in the Arduino code and I’m ready to rock.
Since the new Z Wave code only compliments the push button code, there’s nothing I had to change on the button code. I simply added the additional Z-Wave information. Like I said, check your pin assignment (just guess, then just fix it if you guessed wrong) for the OPEN and CLOSE signals are correct. Then it’s ready to load.
| |
I haven’t had to debounce any of the Z-Wave signals yet…mainly because even if it registers 2, 3, 40 times during the 500-1000millisecond pulse, it’s just telling it the same information over and over again. Since open and close are separate discrete signals, debouncing may not be necessary. That’s the difference in the button (one button does 2 things: open and close) and the module. I don’t know if I get a power surge or something and the Trinket will think the module sent an OPEN signal. If it happens and it’s a problem, I can add the same debouncing code as the button to each of the signal blocks. “Wait 250milliseconds, if it’s still low, operate the blinds.”
The Retrofit
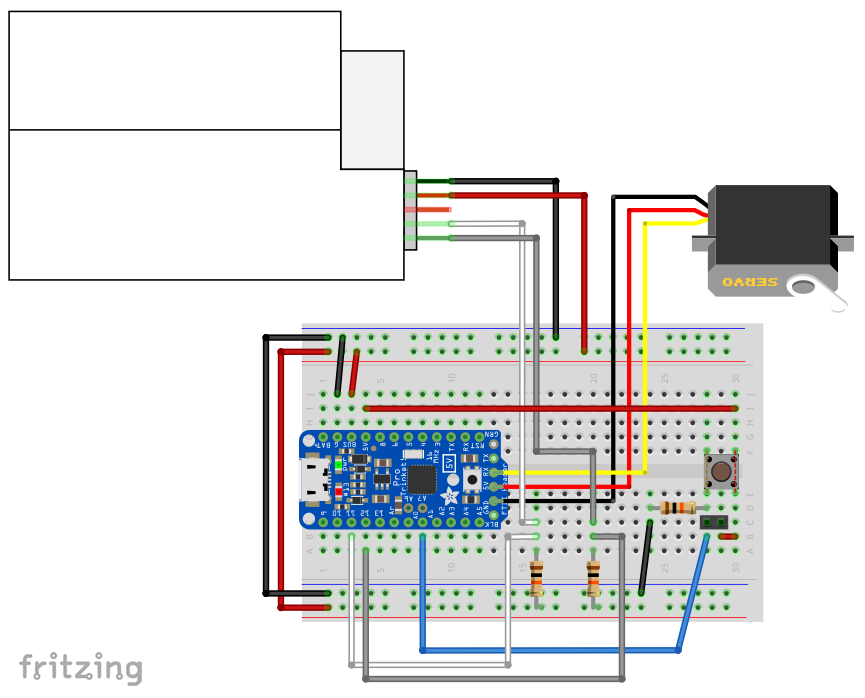
So I grabbed the ol’ soldering iron and went to work attaching the new resistors and soldering in the wires from the Curtain module’s connector into the Trinket. I simply soldered the two resistors across the board from pins 11 and 12 to the Bus pin on the other side. This allows the Trinket to maintain a pretty low profile. The White Wire and Gray Wire into pins 11 and 12, then Red Wire in the Bus pin, and finally the Black wire into the GND pin. The Brown (STOP Signal) is left alone, just along for the ride.
That’s it. It was slid back into the blinds, then mounted the discreet little white box up at the top of the blinds, plugged it in, and done!
The final result is what you see here.
The Source
You can do this too. It’s not that hard. All the data you need is right here, you can skip through my pains of working out the problems…just grab and go. I’ve decided to run things though a CC-BY-4.0 license. If you want to use it, just attribute the source. Also, let me know if you improve on the build…you probably can do massively better than my soldering for starters.
- Assembly Model Source Data - OnShape
- Mount Block FDM Model (.stl)
- Tilt Rod Block FDM Model (.stl)
- Assembly Drawing (Block Drawings also) (.pdf)
- Assembly Schematic Diagram (.pdf)
- Arduino Code (.ino) - Github
- Graphics (.fzz) - Github (Using Fritzing)
- Custom Board Gerbers - Github (Not used, but could be useful.)
In general you can get all the latest parts/code from this Github repository and–like I said–offer better ways of doing things.